
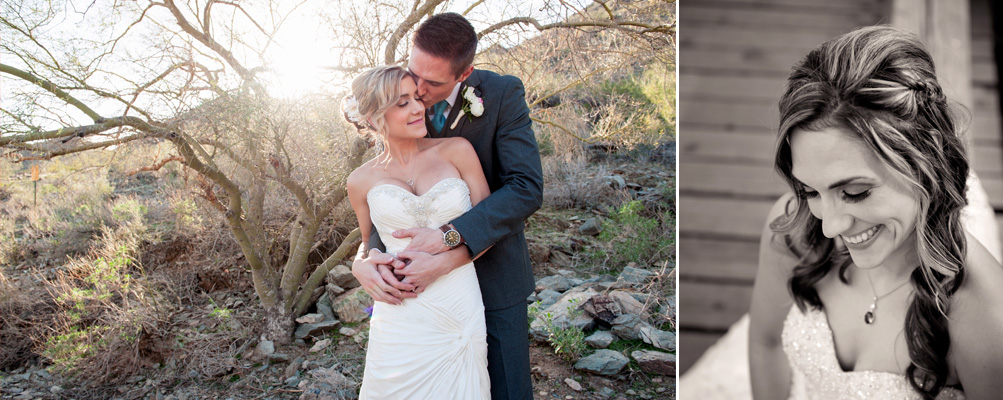
The perfect day for an amazing wedding. Courtney and Leo look absolutely amazing! You can just feel how much they love each other in these images. It was so hard to choose which images to include in the sneak peek. I have so many favorite images!!!
I hope you enjoy these – I know I do!

![]()

![]()

![]()
![]()
![]()
![]()
![]()
![]()
![]()
![]()
![]()
![]()
![]()
![]()
![]()
![]()
![]()
![]()
![]()
Matt Maseco - You two are cuties.
Michael McCarthy SR - Awesome Pictures of My Sons Wedding to his Beautiful Bride. I will Cherrish them as long as I live. Thank You for such a Wonderful Awesome Job on the Pictures. Michael McCarthy SR
Kacie - Beautiful pictures! Gorgeous wedding!
John Fry - Awesome photos! Can’t wait to see the rest and the video lol 🙂 you guys look great!
taylor stevens - You look amazing! The pics turned out great! 🙂
Laura - Awesome!! These look great!
Heather - Beautiful photos, they turned out lovely! You picked great photographers, they captured every moment of your special day.
Miriam Lind - Great pictures! The wedding looks absolutely beautiful! Congratulations! 🍾💍🎩
Kaycie Smith - Holy cow!! Great pictures! The wedding looked beautiful!
Erin O - Crystal you look abaolutely stunning!
Heather Gabriel - Sweet pictures! Beautiful bride
Kristie Gartley-Lance - Love. Love. Love. 💕
Jennifer Short - I wish I could have been there! Beautiful pictures!
Brett Powers - It was awesome to be a part of your guys’ special day!!!
Jacqy K - Amazing couple. Beautiful pics!
April P - Beautiful pics. You guys look great.
Sondra Hoover - Beautiful Bride, Handsome Groom! Awesome wedding photos!!
Richard Hoover - Wow! The pictures captured the day perfectly!
Alex franko - Wedding was fun, great pics!
Audrey - Awwwww!!! So precious.
Holly - Beautiful couple! Nice work Jill & Chris!
Tammy - Beautiful wedding, beautiful pics!! Loved the reception, allot of fun.
Lori Connell - I love your gown Crystal !!! All of these pictures are fantastic. I look forward to seeing more.
Helen & Bob Bamrick - What a beautiful wedding and reception! Our grandchildren, Mike and Crystal, will enjoy reliving *their day* through these beautiful life-like photos, for the rest of their lives. May they be blessed with a lifetime of happiness together – at least as long as we have – which is currently 51.5 years and going strong.
Jenny - You guys had the best photographer! And I love your dress, Crystal!
candace schulden - Love the pics….
Tim gaul - Your husbands face… Priceless
William brown - Beautiful pics u guys
Shawne - You look beautiful Crystal. Amazing pictures to capture your special day forever.
Heather Bamrick - The emotion and love shown on the these pictures shows the true love between these two. This was an awesome wedding to experience. The pictures are priceless.
Emma - Holy cow! You guys look great! Beautiful pics!
Tracy - Beautiful Wedding Photos!! Can’t wait to see the rest!
Jessica Raynes - Can’t wait to see the rest!
Tim - Great Pics!
Matt L. - Wow. Never imagined these pics could turn out so well
Neva Harris - Beautiful beautiful photos of such a beautiful couple.
Kara Williamson - Your dress is beautiful!
Sky - The pictures look great! The wedding was beautiful! Congrats to you two!
Kayla - I loved my dress and your dress!
Kyle - My watch! Sweet!
Angela - Cute pictures. Can’t wait to see more.
Bridgette - Holy moly! You guys look amazing!!
Anne - Awesome pictures Mike and and Crystal! Loved your wedding!!
Steve Ruckle - Your DJ was awesome. Can’t wait to see the pics from my sweet dance moves! Oh, you guys look great too!
Annabelle - Kayla and Crystals dress is so beautiful!
Sandi Childs - Crystal! The emotions on your new husbands face is priceless!
Jennifer Keller - Awesome pictures!
Danny - Miss working with you Crystal! Great pictures!
Jessy - Your rings, your dress … And you! Breathtaking! 😃
Marilyn Adams - Your new husband is dashing!
MistyRose - You look absolutely gorgeous! 🙂
Sue - Beautiful photos of a beautiful couple.
Patsy Woods - My beautiful granddaughter and her husband! Loved your wedding!
Woody Woods - Welcome to the family Mike! Your wedding was beautiful!
Chase - Wow, great photos, now I know why we waited so long for dinner hahaha jk!
Lisa - You two look so happy, what a beautiful wedding!
Ashli - Beautiful!
Heather - 😀 Great pictures.
Sandii - Beautiful wedding ….lots of laughs!! Pictures look perfect😊😊😊!!
Yadira - Beautiful pictures❤️
Francesca - Beautiful pictures for a beautiful couple! Congratulations!
Yadira - Lovely pictures!!❤️
carmen zuniga-ross - Beautiful day and a beautiful couple, these photos capture just how in love they truly are and it was an honor to see. Love, Carmen .
Sloan zuniga - So happy for you both congratulations!!!!💕💕💕💕💕
Vanessa Hancock - Amazing photography for such a beautiful day! Congrats!
Sharon - I love your dress! congrats you two I hope you guys are super happy.
Ryan couture - Congratulations you guys.
Leanne C. - Crystal and Mike McCarthy…. you both looked amazing on your special day! Congratulations
Colleen - Beautiful couple & gorgeous photos! Congrats and best wishes!
Lisa Wease - Great pics! Congrats on your marriage!
Diana - Beautiful pics! You guys look so happy.
Sheila Acres - Your pictures are very nice. The Photographer did a great job.
Erica Baxter - I love these pictures! You looked amazing! And he look on his face when he sees you, says it all. So happy for you two!
Suzanne Tomitz - Beautiful pictures!! Looked like a magical day captured on camera!
Pablo Navarro - Congratulations Mike and Crystal McCarthy the wedding was awesome great pictures as well thanks for having me part of the wedding.
Angela Ruggiero - Great pics! Congrats Crystal and Mike!
Emily Guthrie - Love these pics!!! Congrats Crystal & Mike!!
Julia - So beautiful! I wish you both the best!
Megan Flores - Gorgeous pictures! Congrats to you both!!!
Sissy - These pictures are amazing! What a great way to relive your amazing day! Crystal and Mike look beautiful and happy in every moment captured!
Ashleigh Kilts - What couple cuties!
Rebecca - Stunning pictures! Congratulations Crystal and Mike 🙂
Hannah - Great photos, Crystal! I especially love that they captured Mike’s expression as you walked down the aisle. What a beautiful moment!
Kat Schauder - Soooo cute!!
Nikki - Stunning- love the look in Mike’s eyes when he sees you coming down the aisle. Congrats on your forever 🙂
Kirstin - Amazing ! Congrats!
Brittney - Beautiful!!! Congrats guys!
Sunny - Beautiful!!
Becky Jenkins - Stunning pictures and beautiful memories from an amazing wedding, Congrats Mike and Crystal, I cannot wait to see the rest!
Ashley - Great photos crystal and mike
Hannah Wessel - You look beautiful Crystal, I hope your day was everything you ever dreamed of! 🙂
Melandie Renuard - Absolutely stunning pictures!
Courtney Grable - Absolutely stunning bride! What a beautiful wedding! 🙂
Lilly Bug - AGH!!! So adorable!!!! I love seeing these pics!!
Kim - Beautiful pictures!
Yasmina - Beautiful!
shari - Great pics, congratulations!
Terrey Asher - What a beautiful bride, great pictures.
Lora - Nice pics! Congrats!
Tionna Lyn - Congrats Crystal and Mike. Crystal you looked absolutely beautiful and Mike I must say you were looking rather dapper yourself. Wish you guys much love and a lifetime of happiness!
Sam S - Yay congrats you guys!
Nancy M - Beautiful pictures!!! Beautiful wedding!
CONGRATS Mr & Mrs McCarthy!!
Sandra - Absolutely beautiful pics with beautiful subjects inside and out! The love is reflected so vividly in all of these . Great job!
Denee Porter-Ishak - Wow what great pictures! What a beautiful couple ❤️
Kristen - Absolutely beautiful! Congratulations!
Laura - Lovely pictures.. wish you all the happiness and health..
Lynda Stewart - So beautiful!! These photos really capture the day and the love!!
Angela - Congrats! 🙂
best man aka ray - What a honor and pleasure to be apart of something so epic! Great memories!
PS big mike thanks for the bottle opener!!!
Sara-Jean warner - You guys are so beautiful!!! Good luck!! 🙂
Mikala Bliss - Love the pics! Congrats
Corrie - Crystal you look so beautiful in these! Congrats! 🎉
Ashley - These photos are amazing! So happy for the two of you! Sorry I couldn’t make it!
anna - Such a beautiful wedding, so sorry we missed it, but these pictures make up for it a little bit, all my love to you and your hubby! xoxo
Tammy - pictures are beautiful!
Miah - Love them!! So happy for you Crystal!! 🙂
Carol - Beautiful wedding and pictures. You both are very much in love
Stephanie - I love the emotions you were able to capture in these pictures. Beautiful!